When you use CamillaDSP configuration files from an older version, or update CamillaDSP to a new major version, you may need to update your configuration files to make them compatible with the current version. For the upcoming CamillaDSP 5.x, this is also the case.
CamillaDSP itself does not support updating configuration files, but luckily, CamillaGUI does.
This article explains how to update your configuration files to the current CamillaDSP version. The article is written from the point of view of a moOde audio player user, but is also usable when only CamillaGUI is used.
Invalid CamillaDSP config files in moOde
When a CamillaDSP configuration file is invalid, you may see a message indicating that the output device could not be opened.
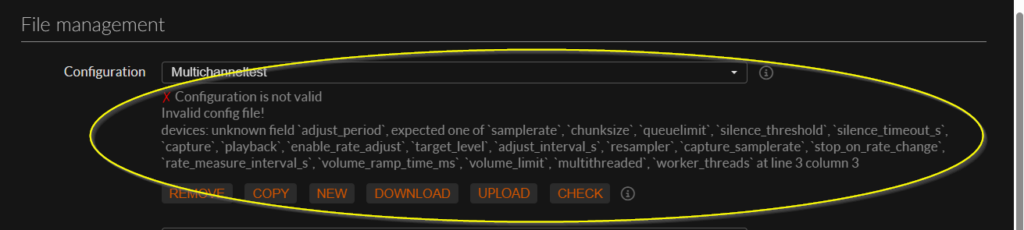
You can check whether a configuration is valid in moOde by selecting the configuration in the File Management section. If the configuration is invalid, a red cross is shown along with the reason for the error
Open CamillaGUI in moOde
If working with moOde (skip if your are directly working with CamillaGUI):
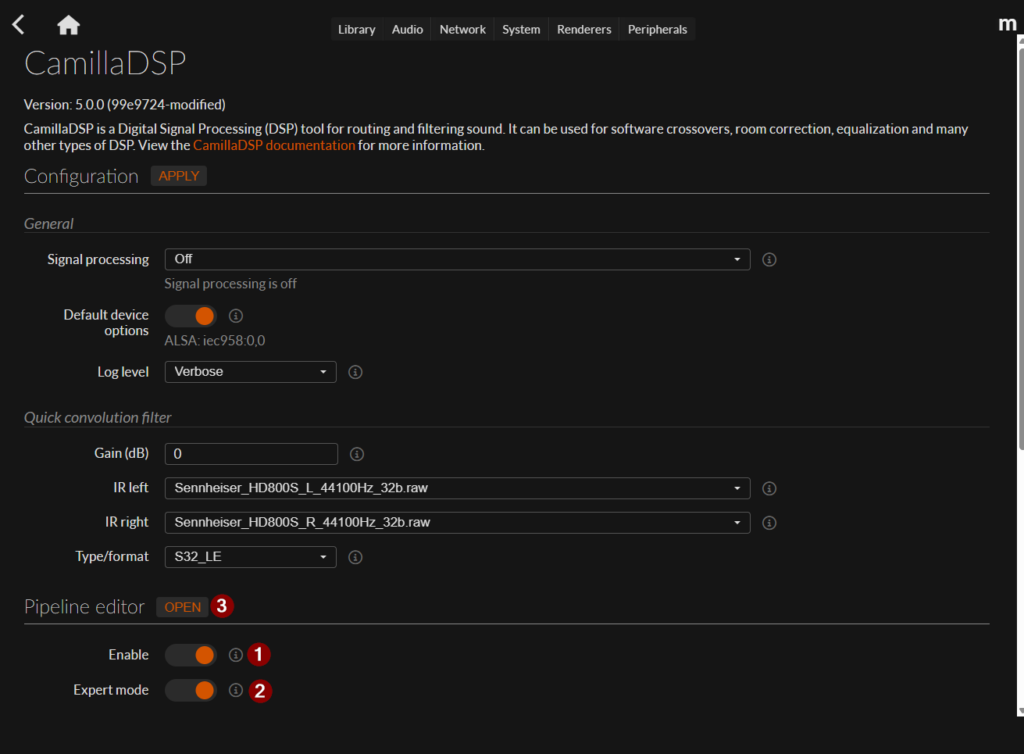
Open the CamillaDSP page in moOde.
If not already start the CamillaGUI (in moOde called the pipeline editor):
Press Enable
Press Expert Mode (if present)
Press open
Updating CamillaDSP configuration files
Updating a configuration is done by importing the configuration file and saving it again. During the import, outdated constructs are replaced.
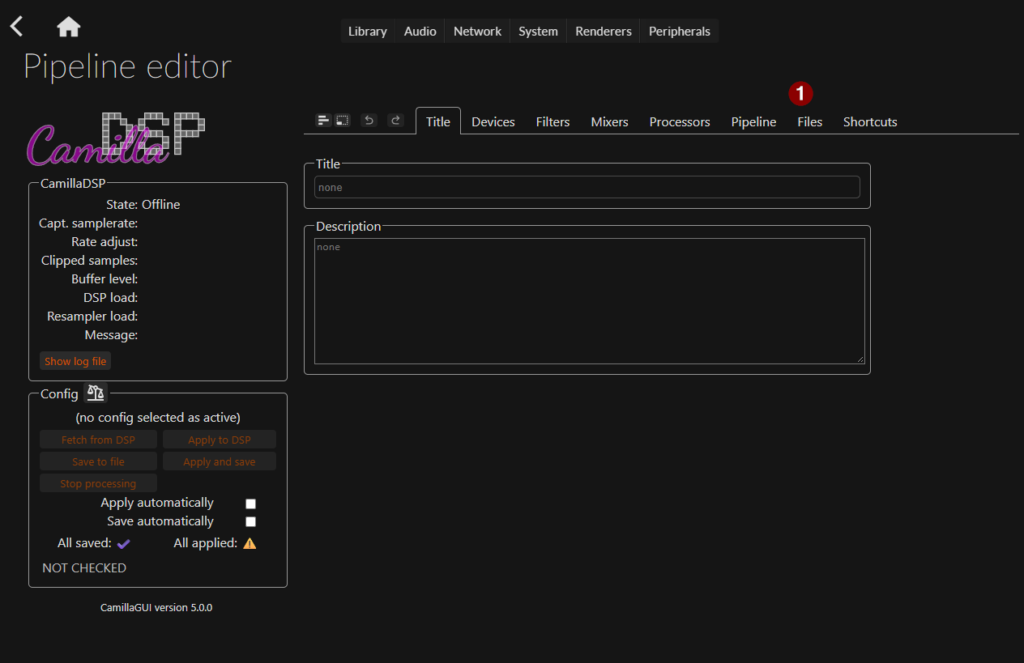
In CammilaGUI select the Files tab .
When you have “bad” configuration files, you will notice that the Valid column contains a red cross for each invalid configuration file.
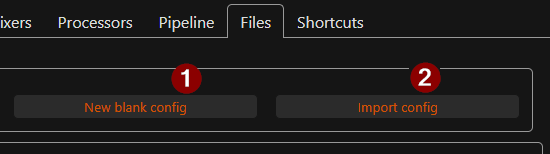
Before importing, you need to create a clean, new configuration, because the import is actually a merge. This is very convenient when you want to copy filters and mixers from other configuration files.
Press “New blank config” button above the file list.
Next is import the invalid config file:
Press the “Import config” button above the file list.
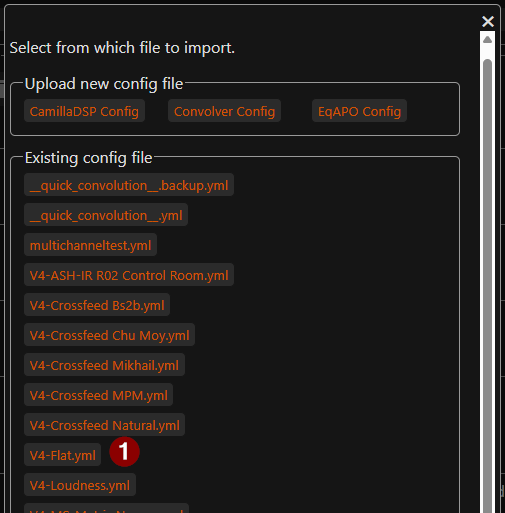
You can supply an external file (with upload new config file) or select an Existing config file.
Select the file config you want to update.
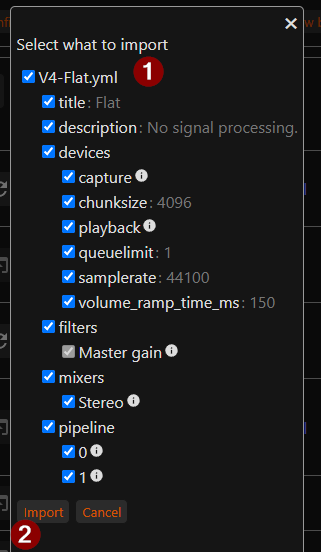
Next is to select what you want to import.
Select top one, this will select everything else.
Followed by the Import button
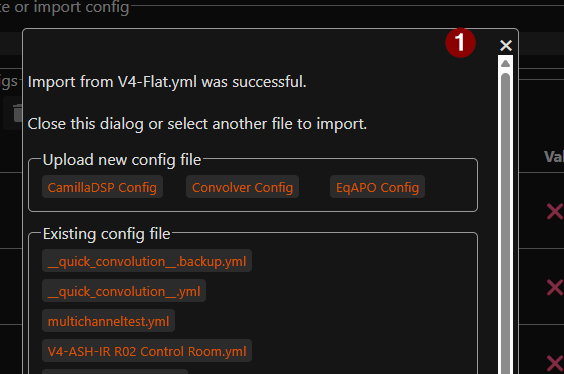
It will confirm that the import is
Close the import dialog with the X in the the upper right corner.
During the import, old configuration constructs are migrated to the current version. Finally, save the updated configuration file.
We have two choices.
Save over an existing configuration file:
At the file list press the save icon at the left side of configuration file name.
Or save as a new file:
At the bottom of the file list enter a new name and press the save icon.
In both cases, the Valid column should now show a check mark instead of a red cross.
moOde supports various audio sources. The most common used sources are (network) files and streaming (UPnP/Airplay/Bluetooth). Also alternative renders like Roon and LMS are available. But what if you want to capture external source like SPDIF or analog?
Maybe you just want to select you source digital, or stream it over the air or you just want to apply CamillaDSP to everything you play. Currently this isn’t supported out of the box with moOde. Luckily it can be accomplished with very small effort.
What will we do?
Sorry but this is going to be a long read:
First we will collect some info about the available audio inputs.
Next make a configuration which make dealing with the inputs easier.
The main dish; how to use the inputs in a little bit fancier way with MPD/moOde.
And for the hardcore audience; as dessert followed by an how to use the inputs with CamillaDSP directly.
None of the activities involves programming or changing code of moOde. Just changing setting and creating/update some configuration files.
Because we concentrate on the inputs this time, I assume that you already have setup a working audio output on your Pi with moOde. (At the moment of writing moOde 8.0.2 is used). And checked that CamillaDSP flat config works fine.
The used device
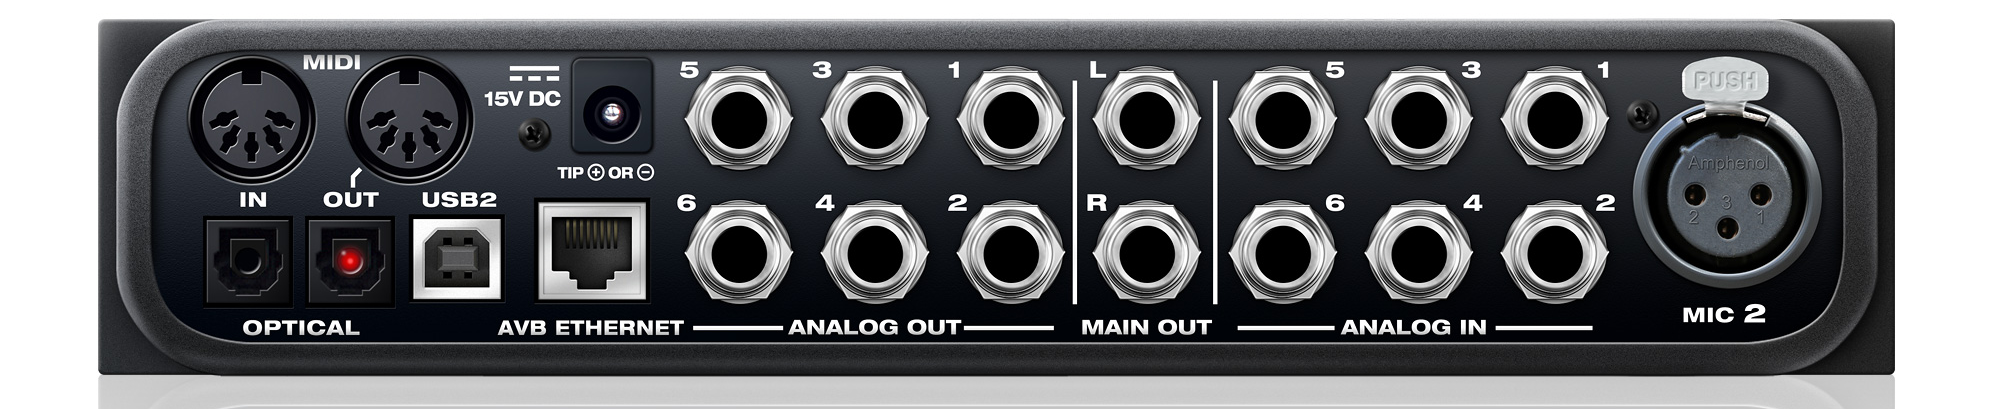
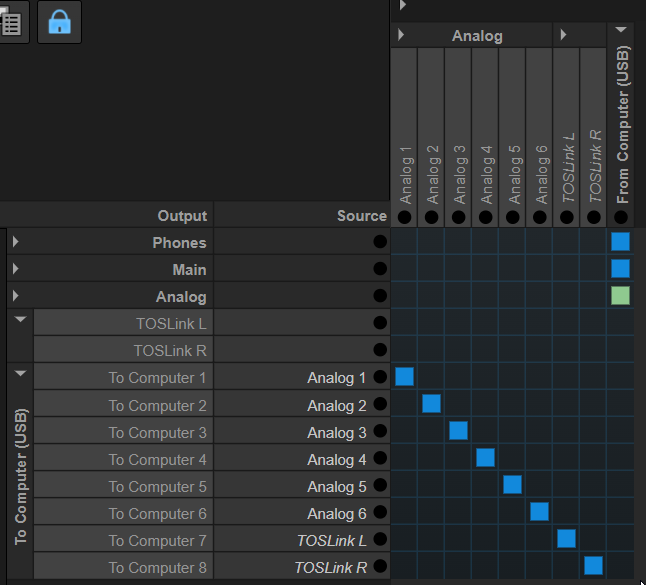
As example device we will use a MOTO AVB device, with the following input mapping:
analog 1 input (device channels 0,1)
analog 2 input (device channels 2,3)
analog 3 input (device channels 4,5)
toslink (device channels 6,7)
This mapping will differ per used device, with most MOTU devices you can setup a mapping in the settings of the device:
Used MOTU Routing table
Disclaimer: I’m using this device because this is what I have at hand. It’s a fantastic device for what I normally use it for. But in the context of this blog, inputs, it (or the drivers) has some quirks. The UAC compatibility is not straight forward. And yes I also tried the Drumfix drivers from github. If you’re interested I have a prebuilt debian package for moOde available.
Device details
Before we start configuring the system, we need some details about the device. The same tools can also come in handy when solving problems.
List available usb devices
pi@moode:~ $ lsusb -tv
/:  Bus 02.Port 1: Dev 1, Class=root_hub, Driver=xhci_hcd/4p, 5000M
    ID 1d6b:0003 Linux Foundation 3.0 root hub
/:  Bus 01.Port 1: Dev 1, Class=root_hub, Driver=xhci_hcd/1p, 480M
    ID 1d6b:0002 Linux Foundation 2.0 root hub
    |__ Port 1: Dev 2, If 0, Class=Hub, Driver=hub/4p, 480M
        ID 2109:3431 VIA Labs, Inc. Hub
        |__ Port 1: Dev 3, If 0, Class=Audio, Driver=snd-usb-audio, 480M
            ID 07fd:0005 Mark of the Unicorn
        |__ Port 1: Dev 3, If 1, Class=Audio, Driver=snd-usb-audio, 480M
            ID 07fd:0005 Mark of the Unicorn
        |__ Port 1: Dev 3, If 2, Class=Audio, Driver=snd-usb-audio, 480M
            ID 07fd:0005 Mark of the Unicorn
        |__ Port 1: Dev 3, If 3, Class=Audio, Driver=snd-usb-audio, 480M
            ID 07fd:0005 Mark of the Unicorn
        |__ Port 1: Dev 3, If 4, Class=Audio, Driver=snd-usb-audio, 480M
            ID 07fd:0005 Mark of the Unicorn
        |__ Port 1: Dev 3, If 5, Class=Vendor Specific Class, Driver=, 480M
            ID 07fd:0005 Mark of the Unicorn
        |__ Port 1: Dev 3, If 6, Class=Vendor Specific Class, Driver=, 480M
            ID 07fd:0005 Mark of the Unicorn
        |__ Port 1: Dev 3, If 7, Class=Vendor Specific Class, Driver=, 480M
            ID 07fd:0005 Mark of the Unicorn
Notice the Class=audio with the Driver=snd-usb-audio (or motu when using the drumfix drivers); that is a UAC comptabile interface.
List the available capture devices
Lets see which capture devices are available with Alsa:
pi@moode:~ $ arecord -l
**** List of CAPTURE Hardware Devices ****
card 2: AVB [UltraLite AVB], device 0: USB Audio [USB Audio]
  Subdevices: 1/1
  Subdevice #0: subdevice #0
From this output we learned that the capture device has card number 2.
Get details of the capture device
Now we know the card number we can dive deeper for more details:
For this we will create a file /etc/alsa/conf.d/motu_avb_inputs.conf, with the content below. The name of the file can be anything, as long as it is put in the correct location.
And if you want to play it back (of course use your own device here):
aplay -D plughw:2,0 test.wav
If you came this far for own device, you will have now a working input(s). Next is to simultaneous capture and play it back.
Using inputs with MPD and the moOde user interface
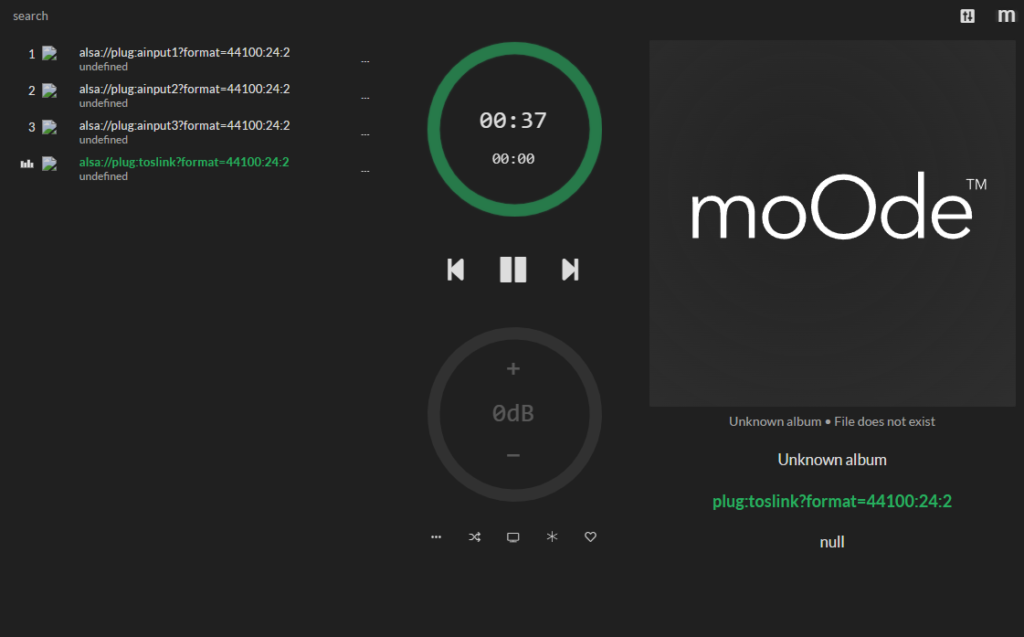
In this mode the audio input is captured by MPD before handing over to CamillaDSP or audio device. This is as simple as creating a playlist with the inputs mapping of above :
Place this file in the playlist directory of your moOde system:
By using the network share \\<moode host name or ip>\Playlists
Or place it directly local on the moode system at the location /var/lib/mpd/playlists/.
In this case I named it motu.m3u.
Unfortunately the EXT information isn’t shown by MPD. It would nicer if the EXT info name was shown instead of the full alsa plugin config.
If it is possible to use the EXTINF, please let me know.
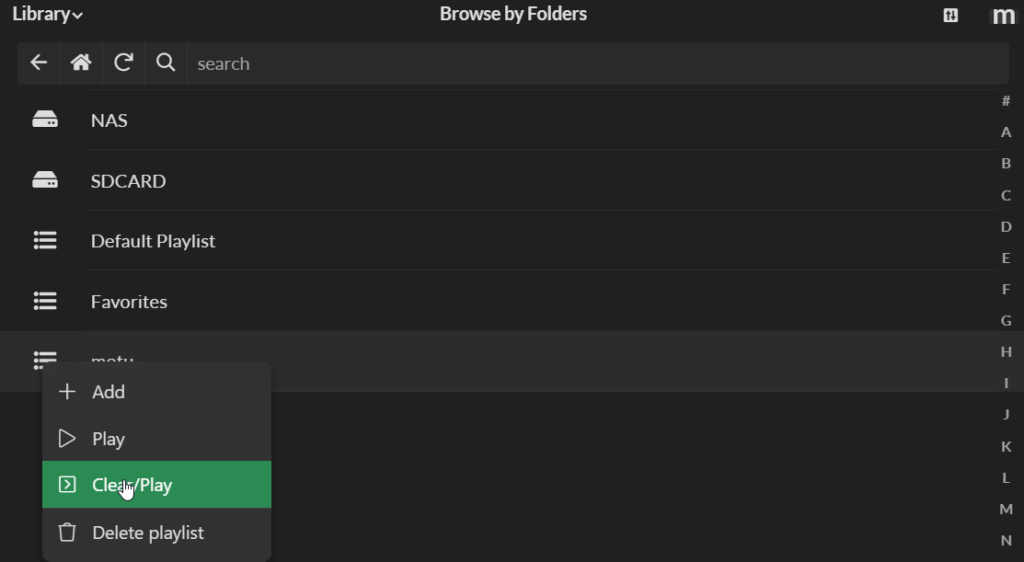
You can find back the playlist in library view of moOde:
Library view of moOde
Press on hamburger menu left from playlist name
And press Add, Play or Clear/Play
Now the playlist is active of the main screen. You can select a different input by click it on in the current playqueue.
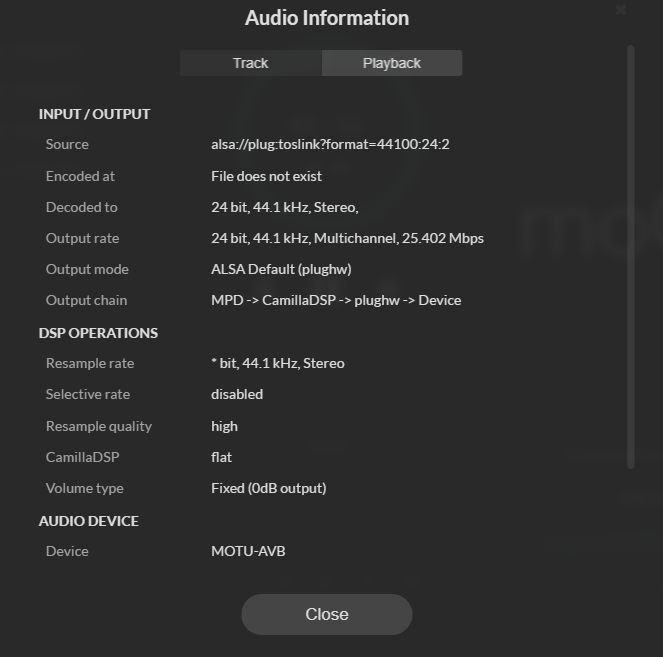
And of course proof that it is playing as expect from the audio information dialog (press the M in the upper right corner and select audio info):
audio information of selected input source
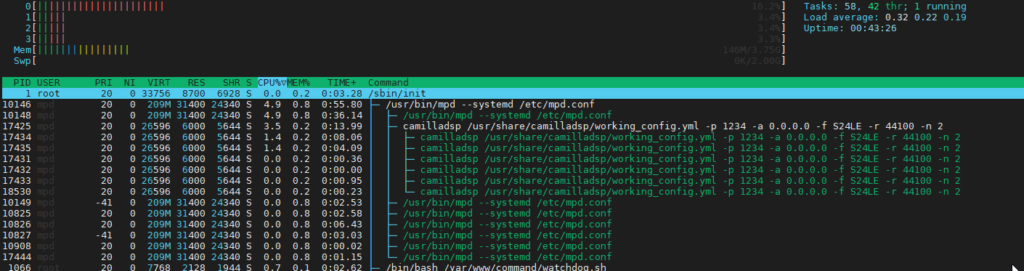
Below is a screenshot with the CPU load of simultaneous capture and playback on a Pi 4:
CPU load simultaneous capture and playback
Despite the fact that the input selection is not fully integrated in moOde, that wasn’t so hard to do. I think we come a long way with the playlist.
Any DSP function like the Peq or CamillaDSP can be applied just like with regular MPD playback.
Using the inputs directly with CamillaDSP
This chapter isn’t needed unless you want to bypass MPD between the capture input and CamillaDSP. But it will be less flexible than the MPD solution.
If you just want to directly use the source with CamillaDSP you can arrange this from the CamillaDSP configuration file.
Only the default configuration of CamillaDSP with moOde doesn’t allow using the inputs from the CamillaDSP configuration file. This is because moOde is using the great alsa_cdsp module from scripple. This module makes automatic rate, format and channel switching possible with CamillaDSP.
But when alsa_cdsp is used alsa_cdsp also is in control of starting and stopping CamillaDSP, which is required when changing rate, format or channels.
To use the inputs directly with CamillaDSP we need to:
This article describes how you can achieve multichannel output with moOde and CamillaDSP. Most setups will only require stereo output, but what if you need more? Luckily this is supported out of the box with Moode.
For this first you need a device capable of handling multiple channel output. With moOde this is limited HDMI or USB interfaces. The Raspberry Pi I2S bus used for audio HATs is only implemented for 2 channels. For the USB audio interface it also applies that the device must be supported by the used Linux kernel (5.15.28 with moOde 8.0.2).
What will we do?
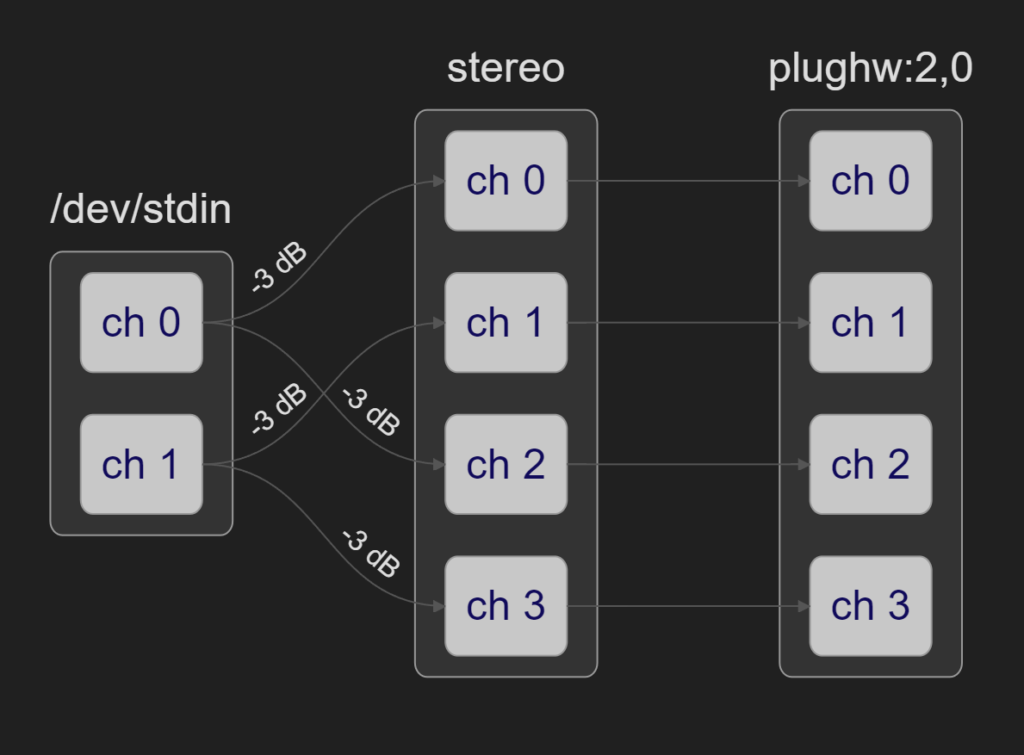
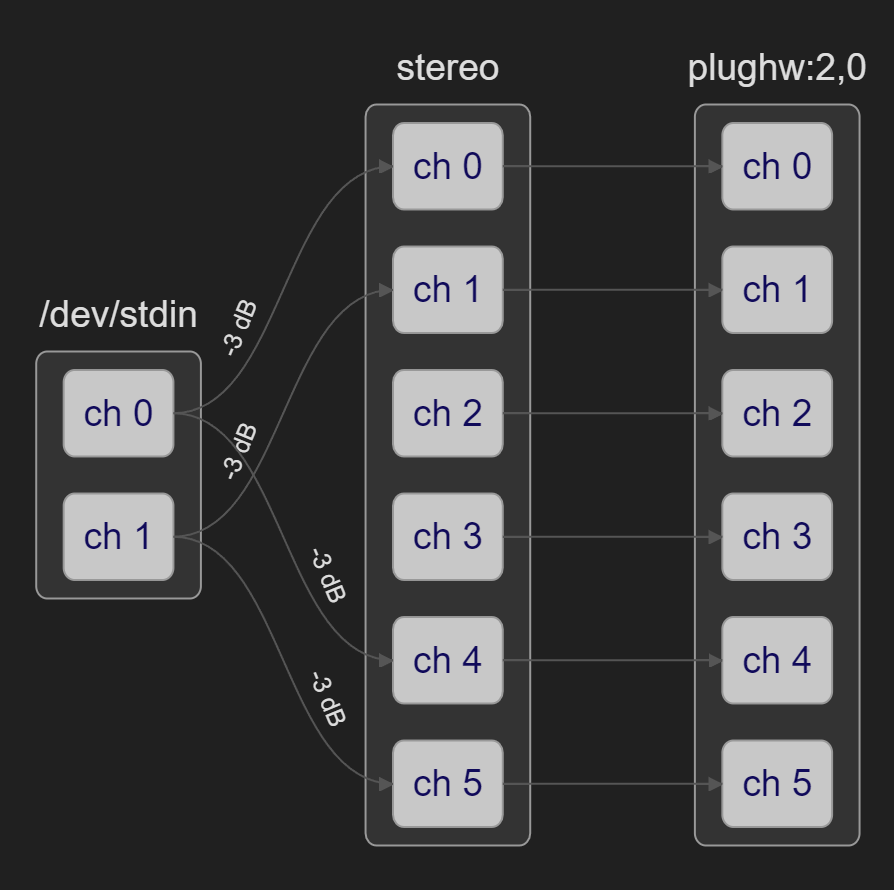
We will setup a very basic 4 channel output pipeline. The stereo source is split from 2 to 4 channels. Of course you own pipeline will more useful, but this is enough to demonstrate how to setup the multichannel aspect with moOde.
pipeline configuration test
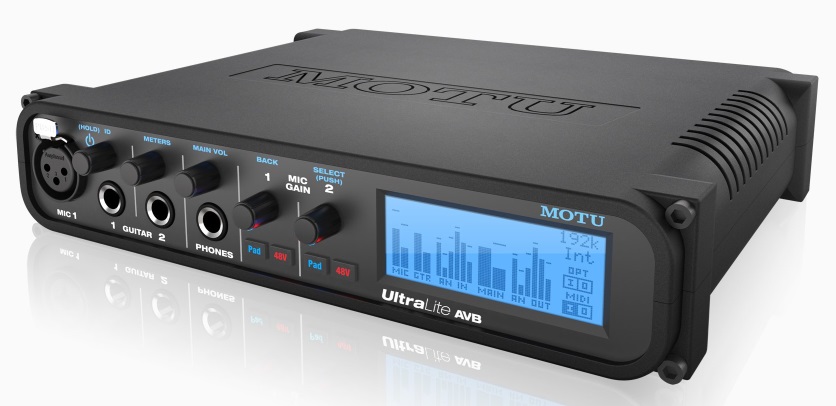
In this article a MOTU ultralite AVB is used. It present it self as 24 channel output device.
Setup correct device
First we need to select a valid audio device for moOde.
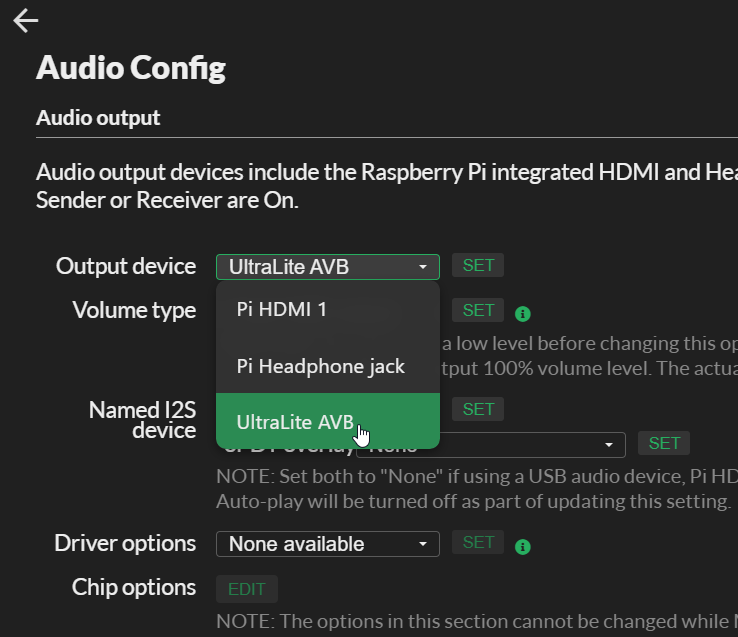
select correct playback device
Open the moOde audio config page
Select the correct device from the dropdown list
Press set
Prepare moOde for CamillaDSP
Create a new ’empty’ pipeline configuration
Copy an empty config as test pipeline:
Open the moOde CamillaDSP configuration page
Select flat from from the dropdown list in the ‘Pipeline configuration’ section
Press copy
When asked for a name any name is good. In the example we use flat-mc.
Next activate that configuration:
Activate the configuration
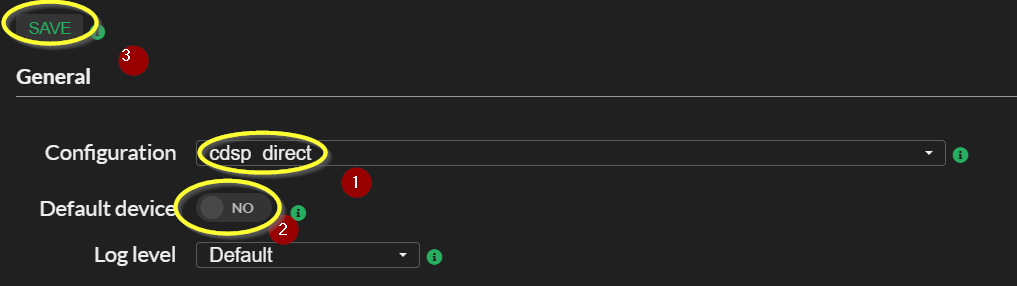
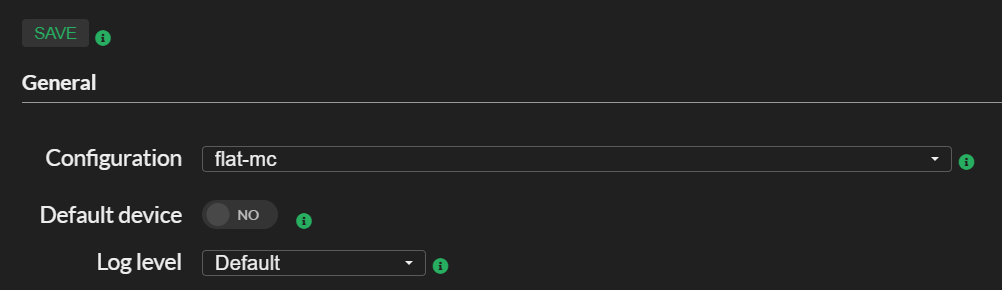
Select flat-mc from from the dropdown list in the General configuration section
Make sure the default device button it toggled to ON (the default)
Press save
Now a nice default configuration for two channels is created and activated for stereo use. Normally moOde modifies the CamillaDSP config values for playback device, audio format and channels.
This time we want to prevent that, because we want to set the number of channels ourselves:
Make sure the default device button it toggled to OFF (the default)
Press save
We didn’t disabled it the first time, to make sure the initial config settings are used.
Next: enable the CamillaDSP configuration editor
Enable CamillaDSP editor
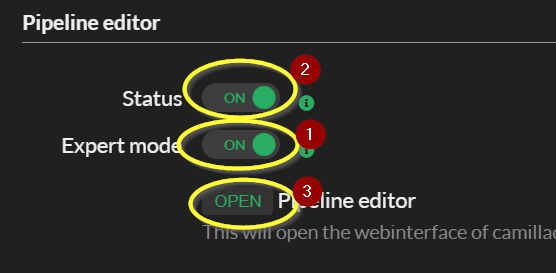
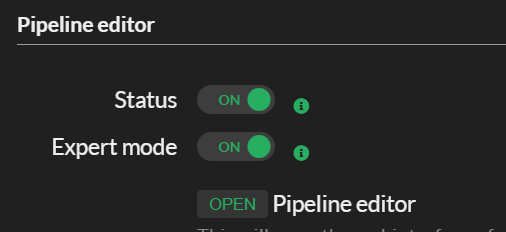
Toggle the status of the editor to ON
Also toggle the expert mode to ON to make some additional settings visible required for multichannel output.
Change the CamillaDSP configuration for multichannel output
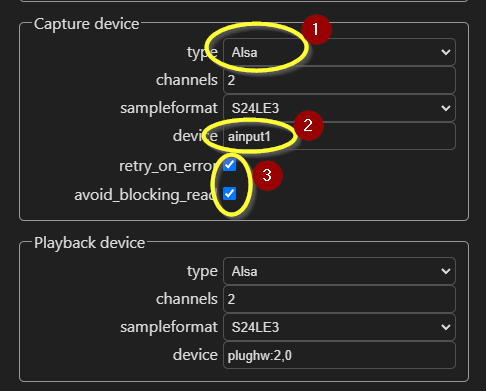
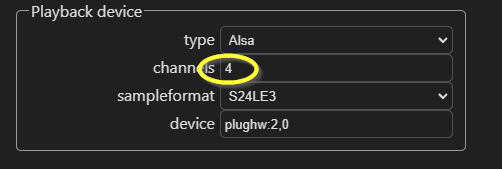
When the CamillaDSP pipeline editor is opened, scroll to the section ‘Playback device’ at bottom. The four available fields are already filled in.
Setting the number of channels
While in this example the device supports 24 outputs, but only 4 channels are set. You should enter the highest channel number of your device that will be used.
If I would have entered 24 channels CamillaDSP would output 24 streams, which wast unnecessary resource like CPU and memory. By using the device with alsa plug (plughw prefix instead of hw), the plug will make a channels conversion for you.
The MOTU AVB devices support mapping of computer channels vs output, which makes it easy to arrange the channels is logical order.
For this device we are gonna use the first 4 channels only, but lets say you want to use channels 5-8, then you should enter 8.
Enter the highest number of the channel you need.
The moment you changed the number of channels, on top the pipeline tab show a red mark that the pipeline contains errors. To correct this we need to change the settings of the mixer.
Click on the mixer tab
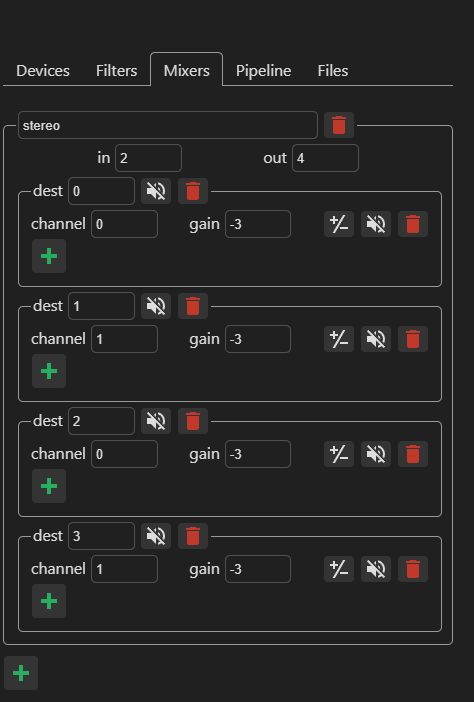
On top set the ‘out’ setting from 2 to 4
press twice the second bottom plus
Set the destination and source channel correct and if you want provide a gain (keep in mind the channels are numbered starting from 0 and not 1!).
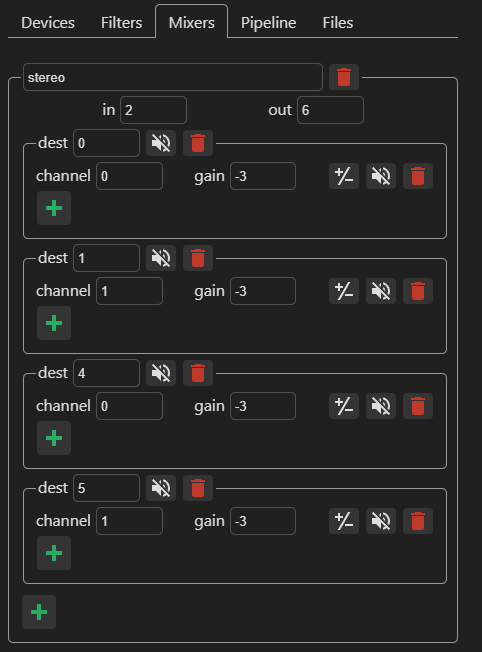
The mixer settings should look like:
Mixer setting updated for 4 channels
You can now press ‘Apply to DSP’ in left sidebar to activate and save the configuration.
The mixer only need settings for the channels you use. For example if you want to use the 1,2,5 and 6 channels, then you have set the used number of channels to 6. The mixer setting would then look like:
Mixer settings with 4 of 6 channels used
And the matching pipeline configuration would look like:
Pipelin with 4 of 6 channels used.
Listen to the result
To go back to the player interface ; press on top op the webpage two times the back arrow
Select some music or radio station to play
Now the stereo source is send to 4 output channels
Without speaker/headphones connected you can also see the output in the CamillaDSP editor.
Go back to the CamillaDSP pipeline editor
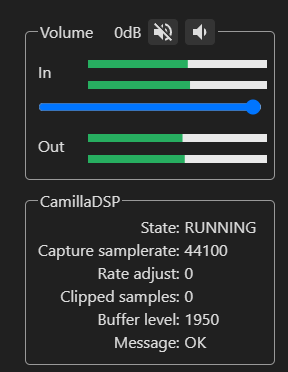
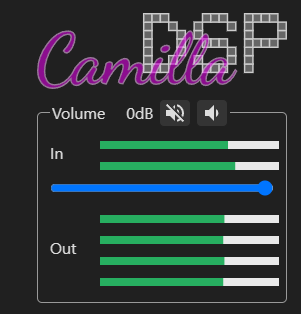
In the upper left corner you can see the meters moving for the input and output:
Output feedback
Now we have everything in place, it is time to make you own pipeline like a nice active cross-over.
With moOde version 7.4 comes a system backup & restore. This article provide some details about the backup/restore. Luckly moOde 7.4 comes , besides an full image, also as an update for existing 7.3 systems.
The backup mananger can be used in the following scenario’s:
Backup and restore to the same moOde version.
Backup and restore to a new moOde version.
Backup and restore to a new moOde version.
Backup and restore to an older moOde version.
All source and target systems should run at least 7.4 or higher.
When restoring to a different version, no supported settings will be dropped. Restoring to an older version is supported as long as it will not take development effort to support it.
Backup content What does a backup contains:
system configuration
radio stations
camilladsp configuration and ir files
if used background image
The same system configuration as with autocfg is supported. Practical that means a lot of settings are supported, but not all yet.
Camilladsp configuration files are restored, but in case of breaking format changes not automatically upgraded. Keep an eye on the changelog of the camilladsp project it self.
Where to find the backup & restore tools?
On System Config page a backup/restore section is present to start the backup or restore dialog.
backup and restore section
How to create a backup
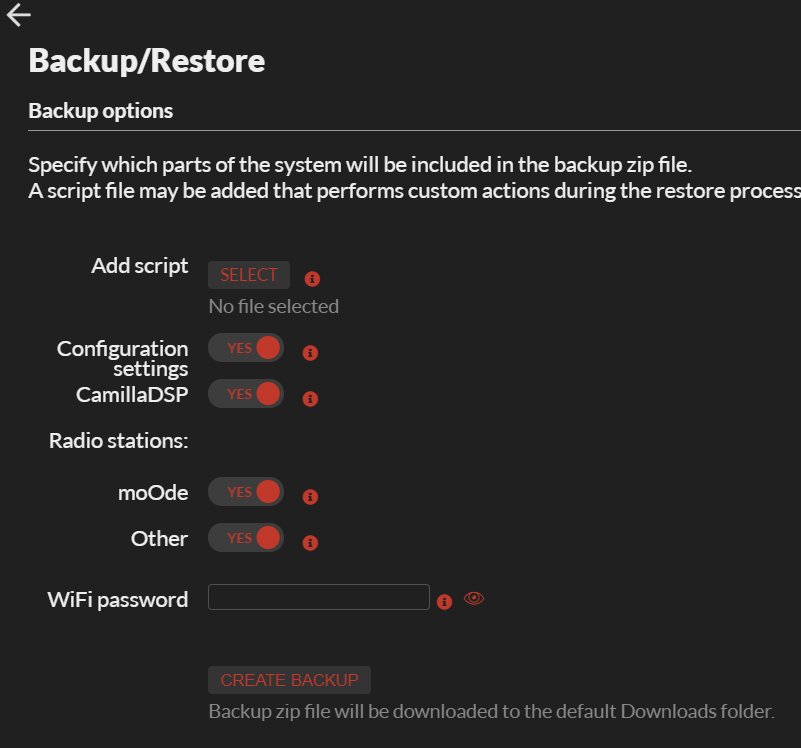
On the backup page several options are available. When your system runs on WiFi a WiFi password needs to be provided.
To support customomazations out of the box an optional a script can be provided that will be executed on restore.
The radio stations exists out of the the system defined ones (moOde) and use defined ones (called Other in moOde). If you want to save some space, you could leave the system defined ones out of the backup.
Backup options
After your press the create backup button a zip file will be downloaded with the backup.
Restoring a backup
There are two ways to restore an backup:
Through the graphical user interface in the browser
Restoring a backup on the initial boot of a system
Through the web GUI
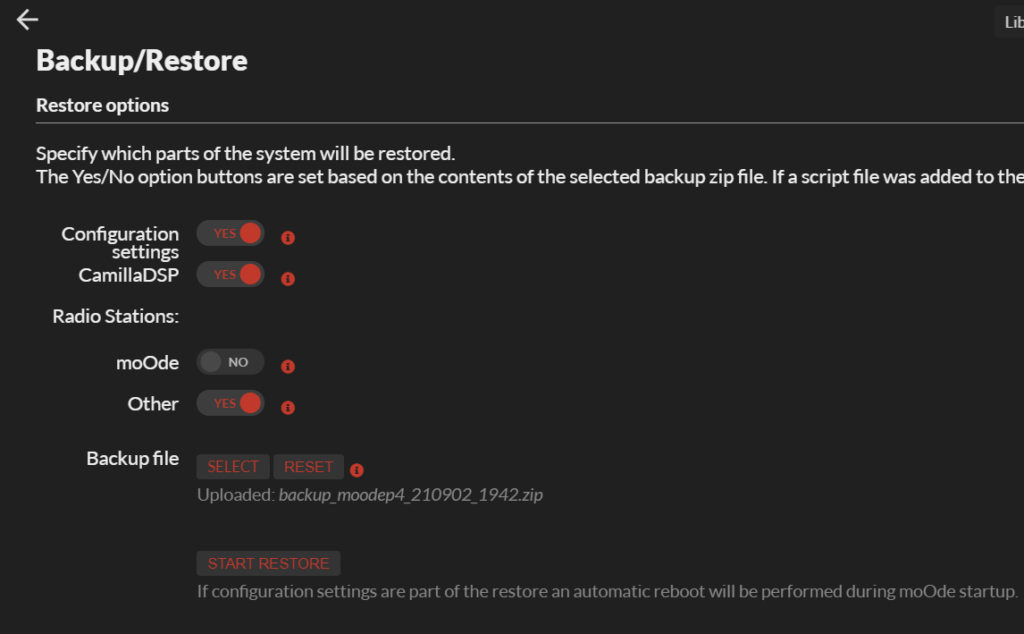
Go the System Config page and press the restore button.
Press select backup file and upload a backup
Restore options
Only the option present in the backup are enabled. You can still disable the restore of parts that are present in the backup.
As last step press the Start Restore button.
If the restore also restores the system configuration settings, automatically the system will reboot twice. It can take a few minutes to complete. Probably you will have to refresh/reload browser manually.
Through the initial boot
This is an easy way to restore backup of reconfigure systems on (initial) boot. Downside is that there is no way to select what to restore from the backup. Make sure the backup contains only the parts you want to restore. For example leave out the system defined radio stations.
Usage:
After burning a fresh SDCard, simply place the backup in the boot partition with the name moodebackup.zip.
For the brave
The backup / restore is based on a number of commandline tools which also can be called directly from commandline.
Especially the radio station backup restore have extended options.
The tools are:
moodeutl – for generating autocfg settings
stationmanager.py – system backup files are compatible with stationmanager.py
backupmanager.py – used both moodeutl and stationmanager.py
The tools contain command line help with -h|--help.
The moOde audio player contains a very rich features set. This article describes the audio infrastructure of moOde as per version 7.3. It show the general audio parts involved and an overview of the ALSA configurations.
moOde is fully GPL 3 based and only uses free available open source software. Shady origins of sources/packages are not used. The maintainer Tim Curtis is very strict on this, which is good thing.
Consequence is that for example some popular streaming service are not native available and only can be used by using something in the middle like UPnP Bubble and UPnP.
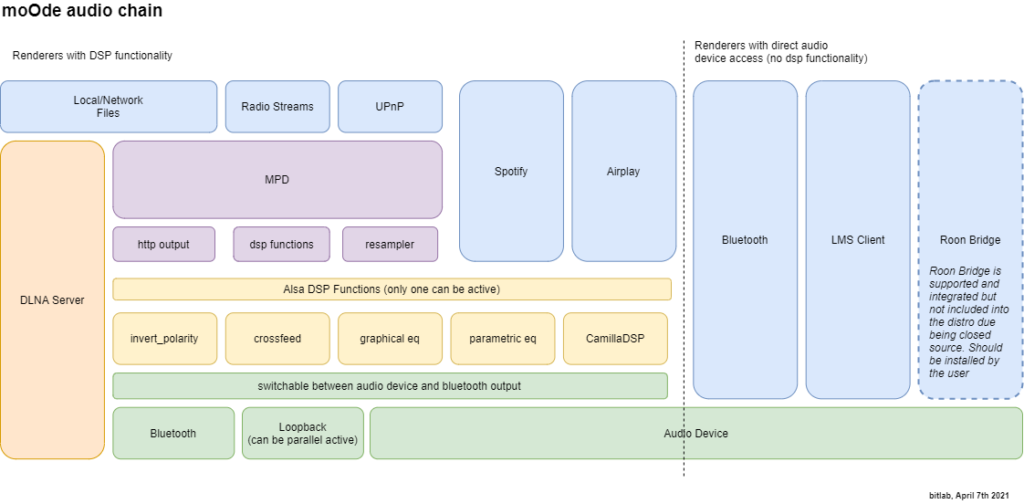
The image below shows an birdseye overview of the audio infrastructure:
moOdes audio chain
This is the infrastructure as moOde is configured and doesn’t necessarily relate to the all possibilities of the specific application or the entire chain in general.
When you select an audio device on the moOde configuration audio or MPD page, moOde update the configuration of all sources to use the correct device.
The blue blocks are possible audio sources. The first three source are inputs to MPD and have the most rich features. Second best are Spotify and Airplay. Bluetooth, LMS Client and Roon Bridge, can only be used the configured audio device, moOde doesn’t provide any DSP options for those. LMS an Roon provide there own DSP functions.
The following alsa dsp functions are available:
invert polarity
crossfeed with several modes available
10 bands graphical EQ (Alsaequal)
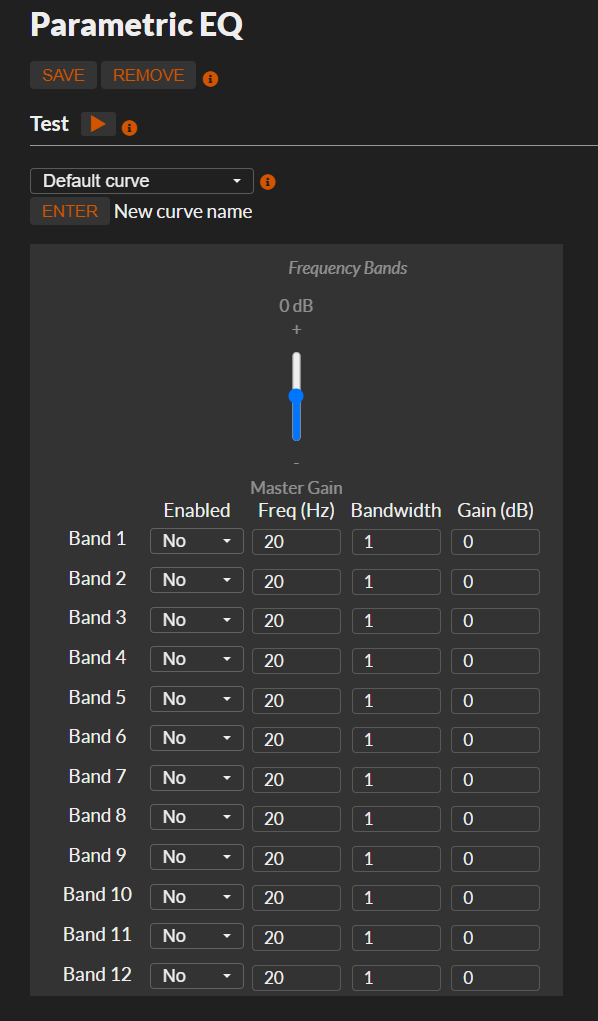
12 bands parameteric EQ (custom 12 bands based on caps EqFa4p).
CamillaDSP very flexible audio processing (think of EqualizerAPO but then for Linux)
When applying an alsa dsp plugin you can only choose one dsp function a time to be active. If you need a combination CamillaDSP is your friend.
In addition if your source is MPD related, first three input, you have also a powerful soxr resampler in MPD at your disposal. Including selective resampling and custom recipes.
Alsa audio path
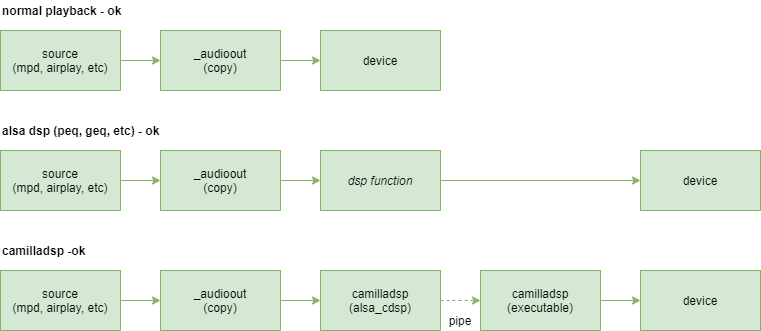
moOde makes use of the Advanced Linux Sound Architecture (ALSA) for audio playback. The diagrams below provide an overview of the path audio has to take from source to device.
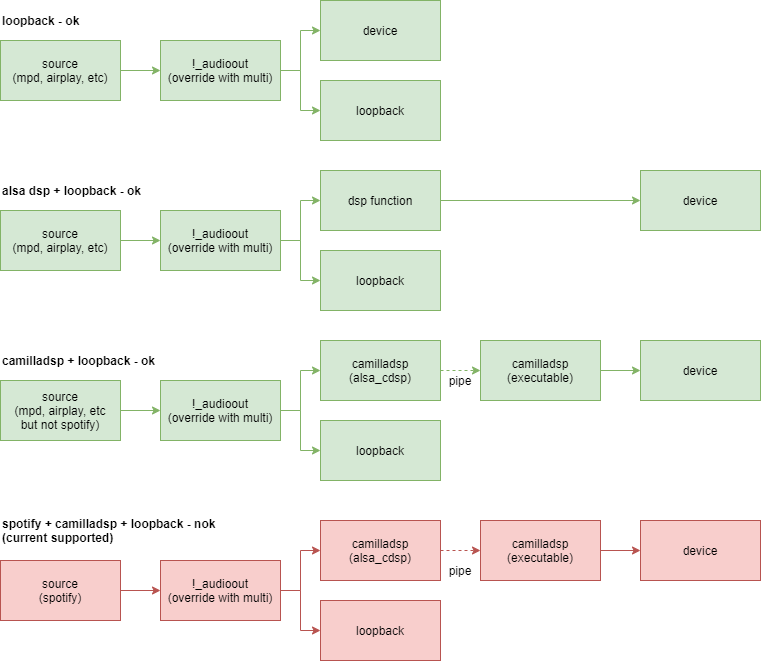
alsa configuration
The default the is to use alsa plughw to access a device. Plughw provides automatic, if needed, samplerate and bitdepth conversion. For example if Airplay provides 16 bit and your device expect 32bit, this would result without conversion in an playback error.
For the purist among us it also possible to use the direct mode (under alsa options at audio configuration page). In the case alsa hw is used to access the devices. This ensures no changes to the audio stream are made, but can result in audio device output errors.
Note: The direct (hw) option is only available for the first and last one configuration.
Loopback
moOde also support splitting the audio with a loopback. The output of the loopback device is intended to be used for visualization extensions. Below are the alsa configuration provided with the loopback on. In this case alsa plughw is always used, mainly to correct bitdepth when required. Notice that the last configuration isn’t supported for now.
alsa configuration with loopback
We reached the end of the article and I hope you now have a better picture about how the moOde audio infrastructure is working.
This tutorial demonstrates how you can build your own filter pipeline with CamillaDSP and moOde. Building your own filter pipelines with CamillaDSP maybe can look challenging the first time, how ever in practice it isn’t that hard to do.
We will use a very basic filter; a biquad low pass filter. No intended to be very useful, but to have an easy to hear divergent sound to check the working of the filter.
Before we start
Before we can start it is very important to comply to the preconditions:
moOde 7.1 or higher installed (how ever 7.2 or higher is advised).
moOde works correctly (plays music)
Use a moOde music source that supports CamillaDSP (like local, network files and UPnP for example)
If used disable all other DSP/EQ functions of moOde.
Correct working CamillaDSP chain (test with the default flat config)
Especially validation that the default supplied CamillaDSP config ‘flat’ is working is important to make sure before our ‘experiment’ start our system in ok.
In basic creating a CamillaDSP config be can summarized as:
Create new configuration
Create filters
Add the filters to a pipeline (at least one pipeline per channel)
Activate the changed configuration
We walk through all this steps.
What will we create
The image below show the configurations we will create:
It contains:
A two channel input (= capture device).
A two channel mixer.
A low pass filter called lp applied two both channels.
A two channel output (= playback device)
The mixer is used:
If need to prevent clipped of the signal.
To normalize the level against my other filter configurations.
Opening the moOde CamillaDSP configuration page
Open from the moOde menu (Yes the M in the right upper corner)
And select configure
Pick from the qucik menu the CamillaDSP option.
The dialog that opens up is the moOde CamillaDSP configuration page. Not to be confused with the pipeline editor from CamillaDSP it self, which is also supplied with moOde. The pipeline editor is lateron needed to edit the configuration it self.
Creating a new configuration file
If you have tested the flat config from the moOde CamillaDSP config, we already have working config so we don’t have to start from scratch.
Let’s copy that configuration:
In the pipeline configuration section select the flat configuration from the list.
Next press copy
Provide a name for the new configuration.
Great we have now a new configuration. By creating the configuration file in this way, moOde will arange the following things for you:
It will setup the correct input device for CamillaDSP
It will setup the correct the output device CamillaDSP.
It will have already an default mixer
By the way if you upload an already created CamillaDSP config, moOde will also update the config to use the correct capture and playback device.
Before we can actually use it, we nee to activate it:
Select the configuration lowpass from the list on top of the screen.
Press save
Before we proceed further this is a good to starting point to play some music. If you have music playing, the changes we will make hereafter will be direct audible.
Start CamillaDSP pipeline editor
Go to the botton of the screen.
If not already active toggle the pipeline editor status to ON. ( After a moOde restart it will turned off again).
Press the open button .
The web paged opened is the very nice pipeline configuration editor supplied by the CamillaDSP project it self, called camillagui.
Because moOde already arranged the correct basic configuration we can directly continue.
Create a filter
Press on the Filters tab
Press on the green plus
A new filter configuration box appears. If everything went well there is already default a Biquad Lowpass filter selected like below.
The only left to do is set the correct by:
Click on the name field
Provide a new name. In this case we will use just ‘lp’
If this filter isn’t present (or you want to select a different filter) use first the type selector to select Biquad filter.
Available filter types
Next the subtype can be selected:
Available Biquad subtypes
With the icon below you can show the bandwidth and phase response of the filter.
Bandwidth and phase respons.
Create the pipeline
Now we created a filter we have to add the filter to the pipeline.
Open the pipeline editor by click on the Pipeline tab
At the pipeline overview we already see the mixer with 2in, 2out present. (It is configured at the mixer tab, no need to change the configuration this time).
Add a pipeline by pressing the green plus.
Default the pipeline is created for the first channel. Make sure it is channel 0 (step 1), not 1 that will be the second channel.
Select the filter from the list (step 2)
We now have only a pipeline for the left channel. Lets add a new pipeline for the right channel:
Press the green plus at the bottom.
Enter 1 at the channel input to assign it to the right channel
Select from the list the ‘lp’ filter again.
If you create new filters you can repeat the process by adding the filter to the two existing pipelines.
With graph button you can generate an bandwidth/phase plot over the entire pipeline. In our case it will be the same as from a single filter, but if you apply multiple filters it provides a great feedback.
Testing the new pipeline
Time to test the filter.
Press the Apply to CDSP button on the right side of the screen.
This will make it active and save the configuration. If you already have music playing it will be direct audible.
This make it very easy to tweak your settings. For example:
You can change the frequency setting of the filter at the filters tab.
After the change apply the configuration.
And check if your changes doesn’t result in clipping (in which you have the reduce the gain at the mixers tab.
Conclusion
We reached the end to this article. I hope you see that creating new CamillaDSP configuration isn’t that hard. Especially in combination with moOde, which will handle most of the hard parts for you. Time for your own adventure to create more usefull configuration yourself.
In part I I explained how you can get CamillaDSP working with moOde 7. In the upcoming release moOde 7.1.0, we have improved the integration a lot. No need anymore for any dirty command line work. Configuration files can edited with a web interface.
Features
The features are:
Dedicated CamillaDSP configuration page
Quick access to the CamillaDSP configuration page from the moOde configuration menu.
Management of CamilllaDSP configuration files.
Management of impules response files for the convolution filters.
Uses the alsa_cdsp module in config_cdsp mode, which passes the samplerate and capture format to camilladsp.
Patching the alsa_cdsp configuration with the correct camilladsp configuration file.
Automatic patching of the configuration files with the correct output device, capture device and sample format. Of course it can also be disabled.
Custom mode where the alsa_cdsp and camilla configuration are not managed by moOde. For example when using multiple output devices.
Quick convolution mode.
While playing music you can switch live between camilladsp configurations.
Start Camillas own very nice web gui from moOde to edit configuration files.
Wave convolution file converter to raw included. Also split stereo wave files.
Software versions are bumped to the latest repo commits just before the 7.1 release.
Before you start your CamillaDSP adventure, make sure moOde functions correct and is able to play music.
And to do some expectation management; moOde doesn’t included measured tooling for creating room/device/speaker responses it self. Luckily there is al lot of tooling available, for example the good old REW. For headphone corrections there a lot of responses measurements/settings available out there waiting to be downloaded by you.
moOde CamillaDSP configuration page
The easiest way to access the CamillaDSP functionality is using the CamillaDSP button from the general configuration screen.
This will open the moOde CamillaDSP configuration page:
General
In the configuration selection box you can select a configuration to use. There are three special ones:
Off – you already guessed it; turns off CamillaDSP
Custom – When chosen alsa_cdsp and camilladsp and related are not managed by moOde. This makes it possible to create a setup different that the default moOde provided. Use only if you know what you are doing.
Quick convolution filter – instead of providing you own camilla configuration file, there is a template for quick setup of a convolution filter. For example perfect for AutoEq headphone corrections.
All other choices are the available configuration files. In the section Pipeline configuration those can be managed, I would suggest to keep the flat configuration. This makes it easy to toggle between the several CamillaDSP configurations files and use the flat one as an ‘off’ mode.
When the Default Device option is active, from the active CamillaDSP configuration the used capture and playback device are patched to use the active device configured in moOde.
Quick convolution filter
Camilladsp works with configuration files. For basic convolution filter a template is present.
You only have to provide four settings to get it working.
Quick convolution filter
The left and right impulse responses can be uploaded in the section convolution file.
The pipeline configuration contains:
2x master gain
2 convolution filter
Below is the graphical form of it:
quick convolution filter configuration
For headphone users among us, the project AutoEQ provide parametric eq and convolutions files for equalization you headphone.
Pipeline configuration
Here you can manage the pipeline configuration files, including checking the configuration and show a graphical form of the pipeline.
pipeline configuration
A few configuration files are provided. Those are not useful for anything then to test camilladsp works correctly.
The easiest way to start building your own configuration files is to copy an existing and open the provided camillagui to create your filter pipeline.
Alternative you can upload you own premade configuration files. See the camilladsp website for the format of the configuration files.
Convolution file
Impulse response files for the convolution filters can be managed here. With the INFO button you can show some basic information about the impulse response file. See camilladsp for information about the supported file types.
impulse response coefficients information
When you upload a wave file, you will notice some red errror marks about the use of a wave file:
Wave files aren’t support. It is possible to treat a mono wave file as raw by skipping the the header (you need to know the header size) in the CamillaDSP pipeline configuration. For stereo files this isn’t possible.
To ease the pain a wave file converter is build in. You can activate it with the convert button. It will:
If the wave file is a stereo wave file split it in to mono files.
Convert the mono files to raw
Add the channel, samplerate and bitdepth (currently always convert to 24bits) to file name.
Remove the original wave file
Update: In moOde 7.3 the convert function is removed, because camilladsp 0.5.2 is used. Which supports direct use of wave files, mono and stereo.
Pipeline editor
The pipeline editor is the web interface provides by the camilladsp project it self.
The status shows if the gui is already running or not. If not it can be started by toggling the button.
The expert mode show some settings you only need to change or check when use custom config alsa_cdsp or custom output device(s).
camillagui is started as a systemd service called camillagui.
On start the camillagui will load the active configuration file. On apply the changed configuration will be activated and saved.
camillagui
At the left side the clipped number of samples are shown. If that is the case you can reduce the input with a gain filter at the front of your pipeline.
At the filter section self there is a plot button which provide the gain an phase response:
Some example configurations
Remember that CamillaDSP is much more then only convolution filters. Parametric EQ or graphical EQ are also easy to implement.
For example below is an Linkwitz crossfeed filter implemented based on the available IIR filters:
Keep in mind that you need IR files for every sample rate you want to support.
Despite the fact that moOde with CamillaDSP is a fantastic solution, the Pi is limited in the available hardware resources. Be realistic about what is required and what the device can do.
Behind the scenes
For the ones who wonder how everything behind scenes works, below a small illustration about the involved and the relations between those:
Camilladsp is audio processor with both FIR and IIR filters, written by Henrik Enquist. Despite Camilladsp is not, yet, integrated in to moOde, it supplies Camilladsp version 0.4.0 to experiment with. This article shows you how.
To integrate MPD with Camilladsp @scripple created an alsa plugin based bluealsa called alsa_cdsp. This module alsa handle switching the audio format for Camilladsp. Also this module is already included in moOde 7.
Also default configuration files are supplied :
/usr/share/camilladsp/config.out.yaml (default camilladsp config used by alsa_cdsp for camilladsp)
/usr/share/camilladsp/config.yaml
/etc/alsa/conf.d/camilladsp.conf (for the alsa_cdsp module)
Before you continue make sure moOde functions correct and can playback audio of the correct audio device. Required is that you are familiar with the SSH terminal and editing configuration files on the moOde file system.
What do you need to your self to make it work
Assign the correct output device to camilladsp.
Make the alsa_cdsp as output available with moOde/MPD.
Edit the camilladsp to contain you own filter pipeline.
Set output device to camilladsp
We assume that you want to apply camilladsp to the same output device as used for moOde, but these can of course also be completely different devices and even several devices.
Normally if you select an output device moOde will update the configuration alsa files. For camilladsp we have to do it our selfs.
Is this case it concerns the device hw:2,0, notice not plughw.
Next is to used the same device as playback device in camilladsp. Open the /usr/share/camilladsp/config.out.yaml (in case alsa_cdsp is in the mode config_cdsp 1, else use the config.yaml variant), in your favorite editor .
Replace the playback device by correct one, just like in this example hw:2,0.
Because camilladsp isn’t integrated yet in moOde and we don’t want to edit the moOde code we have to hijack an existing MPD output.
You can see the available outputs with:
pi@moode:~ $ mpc outputs
Output 1 (ALSA default) is enabled
        allowed_formats=""
        dop="0"
Output 2 (ALSA crossfeed) is disabled
        allowed_formats=""
        dop="0"
Output 3 (ALSA parametric eq) is disabled
        allowed_formats=""
        dop="0"
Output 4 (ALSA graphic eq) is disabled
        allowed_formats=""
        dop="0"
Output 5 (ALSA polarity inversion) is disabled
        allowed_formats=""
        dop="0"
Output 6 (ALSA bluetooth) is disabled
        allowed_formats=""
        dop="0"
Output 7 (HTTP stream) is disabled
Lets reuse the ALSA graphic output for camilladsp.
That output is defined in the /etc/mpd.conf:
audio_output {
type "alsa"
name "ALSA graphic eq"
device "alsaequal"
mixer_type "software"
dop "no"
}
We need to change the device form “alsaequal” to “camilladsp”. Only editing the file directly isn’t a great idea, because the file is is generated by moOde.
Luckily moOde provide a way where custom mpd configurations can be merged with the moode mpd configuration.
First create a custom mpd configuration file called /etc/mpd.custom.conf. Put the following content in it:
audio_output {
name "ALSA graphic eq"
device "camilladsp"
}
This will make sure the device name of the audio output with the name “ALSA graphic eq: is replaced.
If the moOde 7.0.0 image the alsa_cdsp module is in the wrong place (my bad) !!! You have to correct that by running the following command:
Next enable the mpd custom configuration support by running the following command and restart moOde:
moodeutl -A add 32768
moodeutl -r
Final step to activate the output is in the moOde configuration interface. Go to the audio configuration page select a Graphic EQ curve and press SET:
You check this with:
pi@moodep4:~ $ mpc outputs
Output 1 (ALSA default) is disabled
        allowed_formats=""
        dop="0"
Output 2 (ALSA crossfeed) is disabled
        allowed_formats=""
        dop="0"
Output 3 (ALSA parametric eq) is disabled
        allowed_formats=""
        dop="0"
Output 4 (ALSA graphic eq) is enabled
        allowed_formats=""
        dop="0"
Output 5 (ALSA polarity inversion) is disabled
        allowed_formats=""
        dop="0"
Output 6 (ALSA bluetooth) is disabled
        allowed_formats=""
        dop="0"
Output 7 (HTTP stream) is disabled
If everything went well output 4 is active.
Editing the camilladsp configuration
Maybe one day if moOde fully integrate camilladsp including the camilladsp web gui, you will have a fancy configuration editor, but for now you have to do it your self.
Open the /usr/share/camilladsp/config.out.yaml (in case alsa_cdsp is in the mode config_cdsp 1, else use the config.yaml variant), in your favorite editor . And edit it to your wishes, see the camilladsp documentation for more.
After configuration restart moOde with moodeutl -r. Alternative stop your audio stream with the command mpc stop and enable it again mpc play.
If you prefer to upload a configuration file instead , please don’t forget to set the correct output device.
2020-10-29: The new 12 band parametric Eq will be part of of the upcoming moOde 7.0.0 release
The AutoEq project provides headphone equalize settings. The equalizing requires at least a 5 band parametric equalizer and would prefer a 10 bands for optimal results. Standard moOde only provide a fourfold parametric equalizer.
The used parametric equalizer in moOde is the EqFa4p from the CAPs project.
Quoted from the caps website:
Four Mitra-Regalia peaking equaliser filters in series; a vector arithmetic re-implementation of Fons Adriaensens “Parametric1” equaliser[fafil] with minor differences. Parallelisation of the serial filter organisation causes the output to lag by three samples.
With playback the output lag isn’t a concern, I have created a version of the equalizer with 3 x 4 parallel filters.
By lack of an official repo to fork from, I put the latest 0.9.26 source from the caps website im my own Github repo at bitkeeper/caps . The branch eqfa12p_12_band_parametric_eq contains a caps version with an EqFa120p.
Ok technical the name should EqFa3x4p and not 12p, but for now it is EqFa12p.
Getting, build and installing the new caps library
git clone --single-branch --branch features/eqfa12p_12_band_parametric_eq  https://github.com/bitkeeper/caps.git
cd caps
./configure.py
make
sudo make install
Let moOde use the EqFa12p
First to allow alsa to find the new filter we have to register the plugin by creating (requires sudo) a file called /etc/alsa/conf.d/eqfa12p.conf with the following content:
The line that start with controls (all values should be on one single line) contains the setttings exactly the same as with the EqFa4p; per band enable/disable, frequency,bandwidth and gain. Add the end single which is the overall gain. In the example are the setting for my Sennheisser HD800S used.
Mostly with parametric eqs the Q is used instead of bandwidth parameter. The filter bandwidth factor could normally be calculatedby deviding the center frequency by the Q factor. Only it doesn’t seems to be correct with EqFa.
After reading the excellent article Parametric Equalization Theory: Relationship of BW, Q, fo & 3dB points, it was possible to calculate the frequencies for bandwidth of a certain Q. From this it seems that you have to devide the bandwith factor by 2 to get the correct EqFa bw parameter.
As example (generated with a piece of Python code):
With this knowledge is is easy to ‘translate’ the parametric equalizer settings provided by AutoEq. Make sure you setup the controls you your required settings.
Next we should prep mpd to use the EqFa12p instead of the EqFa4p.
As temporary solution you can just edit the mpd configuration file (requires sudo) in /etc/mpd.conf. Replace the device name as below.
audio_output {
type "alsa"
name "ALSA parametric eq"
device "eqfa12p"
mixer_type "none"
dop "yes"
}

If moode is restarted (or the pi rebooted) it will overwrite this file. It isn't a final solution but good enough to play arround a little bit. Now we restart only mpd by:
sudo systemctl restart mpd
If you run the command mpc you can inspect the current used output:
pi@moode:~/caps $ mpc outputs
Output 1 (ALSA default) is enabled
Output 2 (ALSA crossfeed) is disabled
Output 3 (ALSA parametric eq) is disabled
Output 4 (ALSA graphic eq) is disabled
Output 5 (ALSA polarity inversion) is disabled
Output 6 (ALSA bluetooth) is disabled
Output 7 (HTTP stream) is disabled
We nog have to select the third output with the command:
pi@moodep4:~/caps $ mpc enable only 3
Output 1 (ALSA default) is disabled
Output 2 (ALSA crossfeed) is disabled
Output 3 (ALSA parametric eq) is enabled
Output 4 (ALSA graphic eq) is disabled
Output 5 (ALSA polarity inversion) is disabled
Output 6 (ALSA bluetooth) is disabled
Output 7 (HTTP stream) is disabled
If we start the playback of a track, the audio stream is send to the EqFa12p.
Validation
Now everything is in place, it is time for the validation. That is the most easy to see by measuring the bandwidth between 20Hz and 20kHz,
For the measuring I use:
PC with:
RightMark Audio Analyzer
Asus Xonar D2X SPDIF Input
moOde Pi
Output device with SPDIF
With RMAA you can generate test signals as waveform for playback from the Pi. All due the Xonar D2X has nice specs for the analog in- and output, today we will stay digital and use the SPDIF input.
If we compare the bandwidth curve with the required transmission on AudioEq the form is pretty ok. Only the doesn’t match; the dip around 6 + kHz should be lower and around 10k should also be a little be lower. For a first try I’m quite satisfied.
Integration into moOde
The 12 band parametric EQ will replace the current 4 band Eq in moOde version 7. No need to hassle with the scripts above.
2020-09-17 Update: prebuild patched modules are available for moOde. 2020-09-30: The patched modules are part of the upcoming moOde 7.0.0 release.
In November 2017 the Raspberry Linux kernel is updated to support the 384kHz for the i2s bus. Before that time the stock kernel was limited to 192kHz and the generic i2s master driver rpi-dac still is.
With i2s bus the Pi can be used as master or slave. In case the Pi is used as a generic i2s master, the rpi-dac driver can be used. Only this driver is limited to 192kHz by the using of the pcm1794a codec.
This a little bit confusion confusing a generic driver but it use the pcm1794a codec. Therefor also limited to the pcm1794 sample formats and rates.
The use-case for the 384kHz support, is the use of an i2s reclocker connected to a DDDAC1794 NOS. The DDDAC1794 use a PCM1794, according to standard specs it only support up till 192kHz. Only when oversampling and digital filters are disabled, it seems you can go at least up to 384kHz. Any application note or specification which support this behavior would be welcome!
If you are using rpi-dac you can check this by running alsacap:
$ alsacap
*** Scanning for playback devices ***
Card 0, ID `sndrpirpidac', name `snd_rpi_rpi_dac'
  Device 0, ID `RPi-DAC HiFi pcm1794a-codec-0', name `RPi-DAC HiFi pcm1794a-codec-0', 1 subdevices (1 available)
    2 channels, sampling rate 8000..192000 Hz
    Sample formats: S16_LE, S24_LE
    Buffer size range from 64 to 131072
    Period size range from 32 to 65536

      Subdevice 0, name `subdevice
If you are willing to build your own kernel/drivers, you can enable 384kHz support by changing one line:
After the you patched the driver and use it, alsacap should should the new max sample rate:
$ alsacap
*** Scanning for playback devices ***
Card 0, ID `sndrpirpidac', name `snd_rpi_rpi_dac'
  Device 0, ID `RPi-DAC HiFi pcm1794a-codec-0', name `RPi-DAC HiFi pcm1794a-codec-0', 1 subdevices (1 available)
    2 channels, sampling rate 8000..384000 Hz
    Sample formats: S16_LE, S24_LE
    Buffer size range from 64 to 131072
    Period size range from 32 to 65536
Installing a patched module
In the my git repo you can find prebuild modules for the following raspberry pi kernels:
5.4.51-v7+
5.4.51-v7l+
5.4.61-v7+
5.4.61-v7l+
The prebuilds match the kernels from moOde release 6.7.1 and the upcoming 7.
The repo also includes an install procedure for installing the prebuilds or building your own.